photography wall arrangement ideas & inspiration

A seasonal change always seems to align with our natural inclination to change, as well. For me personally, it's been about getting back to yoga, purging the excess "stuff" from our home, and simply finding new cute, modern throw pillows to freshen our living space. This Fall, I also naturally have photography on the mind and I'm feeling inspired to shake up the ordinary. Perhaps, your living space is also aching for a change and you have been trying to figure out what to do with your photographs.. Here's some inspiration for doing just that:

Idea I: A Casual, 'Organized yet Random' Wall Arrangement (with no fuss..)

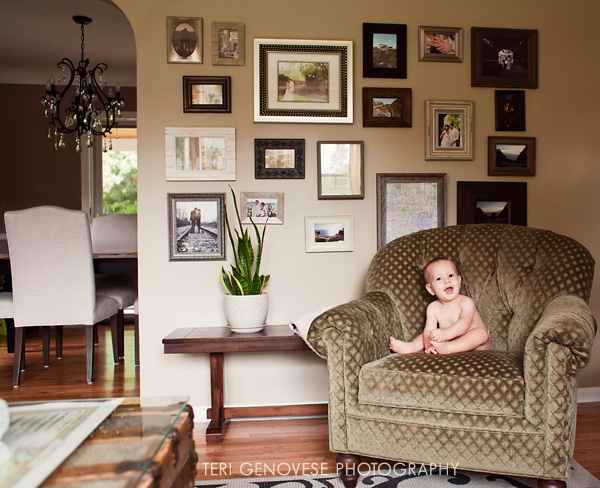
This approach is perfect for wall arrangements that you hope to add to or change over time. In this case my client combined a wide selection of special photographs, from the photos I captured from her engagement session and wedding portraits/reception to their trip to Italy and their destination wedding/honeymoon in St. Lucia. I love that this wall arrangement is a focal point in their living space and celebrates their life before this little bugger came along..

Photography Wall Arrangement Inspiration

Here's a few simple tips for how it was done:

1) Choose your favorite photos. Get a basic idea of what sizes will be needed to fill the space. Record the quantity of horizontals, verticals, and squares (and your preferred sizes for each). Go with your gut and feature your absolute favorite photographs as the largest prints in your display to act as the focal points.

2) Shop for frames that suit the photographs and coordinate with one another - similar color family, texture, etc. Bring home a few extra frames to play with the options. (Note: Professional matting/framing is always recommended for your professional wall prints, but ready-made frames are great for small prints and snapshots. I just discovered these handmade frames and can't wait to order more for a few of my small photographs.)

3) Simply lay out the framed photos on the floor and move them around until they feel balanced.

4) Transfer the frame layout from the floor to the wall. Surprisingly, my client reported that they just eye-balled the layout without measuring a thing! It may seem too easy, but this is the key to give the look of a casual, organized yet random wall arrangement.

Photography Wall Arrangement Inspiration

Idea II: A Gallery Wrapped Canvas (in a unique place):

I was so intrigued to see this canvas hung inside this stylish family's buffet cabinet / hutch. It is so perfect and untraditional. It really inspired me to think outside the box for new ways and different areas that can be decorated with photographs. So many people express that they do not have any wall space, but that's when we can get really creative..

Gallery Wrapped Canvas Display Idea

For reference, the size of this canvas is 16" x 26."

It's such a treat to return to a client's home after some time has passed and see how they have displayed the photographs from our sessions together. Besides having total house envy, I am often so impressed with the finished result and how my photographs have been incorporated into their personal home decor. A huge thanks to my clients for allowing me to share their beautiful photography displays. I hope these examples and tips will help inspire ideas for incorporating your photographs (professional or personal) into your home decor. Have fun with it!

pinhole press photo books

Is it just me or does it seem like we are taking more and more photos every year and printing less and less? In film days, obtaining prints was an automatic byproduct of the process. It was so easy. Digital photography is amazing, but no doubt creates more time consuming challenges when it comes to keeping images organized and printed. I recently tackled a daunting project that I had been putting off for over a year. (It happens!) My goal was to combine our favorite photos from 5 years of living in California – 5 years worth of weekend trips and getaways exploring the west. For many, many months, even just the thought of the project would paralyze me and I’d choose to organize my closet instead.

When I stumbled upon Pinhole Press, I knew I had found my match. Pinhole's minimal design aesthetic and simple work flow solutions turned this overwhelming personal project into a breeze. Because I’m such a geek over a good photo book, I wanted to share these images. This is a 60-page Panoramic Book printed with recycled paper.

Pinhole Press Photo Book

Pinhole Press Photo Book

Pinhole Press Photo Book

Pinhole Press Photo Book

Pinhole Press Photo Book

Pinhole Press Photo Book

Pinhole Press Photo Book

Pinhole Press Photo Book

Pinhole Press Photo Book

Pinhole Press Photo Book

Pinhole Press Photo Book

Pinhole Press Photo Book

Pinhole Press Photo Book

Pinhole Press Photo Book

Can you imagine not having printed photographs of your current life and adventures to look back on, the way we flip through our parents’ and grandparents’ pictures? JPGs, hard drives, and discs may not last forever, but printed photographs will. If you have questions or need advice or encouragement to get started on a project, please email me or post a comment. I love helping people learn how to better organize digital photos and I completely understand how overwhelming it can become!

For the sake of full disclosure, I am a partner/affiliate with Pinhole Press, but only because I 100% love their products and use them for my personal photos.

flashback to Bali..

It's hard to believe it's been a year since this amazing trip. In my continual efforts to print and archive my photographs in a meaningful way, I recently decided that the 500+ 4x6 prints filed in a box would not be enough. So, I'm gearing up to make a Fine Art Photo Book to commemorate our trip.

Pinhole Press is now my go-to place for turning my personal photos into simple, classy, and archival photo books. I highly recommend them and will post photos once my Bali book is finished..

In the meantime, I hope you'll join me here as I dive back into my Bali imagery - I'll be posting travel photography tips along with many more Bali photos that have yet to see the internet. If you have a question about travel photography - ask in the comments or post on my Facebook Page!

(for the sake of full disclosure, I am a professionally affiliated with Pinhole Press, but only because I 100% love their products and use them for my personal photos.)​

Ubud, Bali Travel Photograph

the pictured rocks + a friendly reminder to print your digital photos :)

If you’ve ever wondered what the northern coast of Michigan’s UP (Upper Peninsula) looks like, these images are for you! We celebrated our 6 year anniversary last August with a road trip to the Pictured Rocks overlooking Lake Superior. The water really is that vibrantly turquoise, crystal clear, and incredibly cold. You can ask my husband who had to make sure. His purple lips and uncontrollable convulsions shivering for a good hour was proof enough for me to stay on the shore. . . .

Why the untimely post from... LAST SUMMER? Last year, when I wrote THIS POST, I vowed I would take my own advice and keep up with printing my personal digital photos on a monthly basis. Whoops! Cobbler’s son syndrome, I guess. So, it became my winter goal once again to finally catch up with printing and sharing last year’s personal snapshots. I'm up to 317 prints and counting and it feels SO good to catch up :)

To be honest, I miss the simpler days of shooting film, but I am determined to keep printing and archiving my personal digital photos. When we’re 80, this hard drive and my plethora of digital files and DVD back-ups (like the floppy discs of yesteryear, remember those?) will mean nothing. It’s the prints that will matter. It’s the tangible prints that I file in boxes and design into photo books & albums that will last through the years and bring back memories.

Have you backed up your digital photos and made prints lately? If you need a little help (or a kick in the pants!) to get started, I've compiled some simple tips here.

Pictured Rocks Boat Tour - Black and White Photograph by Teri Genovese

Pictured Rocks Boat Tour - Black and White Photograph by Teri Genovese

Pictured Rocks Photographs by Teri Genovese

Pictured Rocks Photographs by Teri Genovese

Pictured Rocks Photograph by Teri Genovese

Pictured Rocks Photograph by Teri Genovese

Pictured Rocks Photos by Teri Genovese

Pictured Rocks Photos by Teri Genovese

Pictured Rocks Photos by Teri Genovese

Pictured Rocks Photos by Teri Genovese

Pictured Rocks Photographs by Teri Genovese

Pictured Rocks Photographs by Teri Genovese

Pictured Rocks Photographs by Teri Genovese

Pictured Rocks Photographs by Teri Genovese

iPhone-Pictured-Rocks-Photos

iPhone-Pictured-Rocks-Photos

and some iPhone photo goodness from our 10 mile hike, thanks to the always handy Hipstamatic!

How to Organize, Print, and Back up your Digital Photos / Spring Photo Advice

CONFESSION: I recently fell behind in the printing of my personal digital pictures / snapshots for... let’s say about 2 ½ years! To defend my professional photographer self, every digital image file and folder was carefully organized on my hard drive and backed up in a bazillion places (as described below), but I sadly allowed my pictures to be left behind and unappreciated. I personally feel that a photograph that you can hold in your hand is miles more meaningful than viewing the same photograph on a computer screen. Thanks to the harsh Michigan winter and a healthy dose of determination, I finally hunkered down for a few days earlier this year to print and organize hundreds of my personal photos! :)

​I have a sneaking suspicion that I am not the only one who has fallen behind with the constant wave of digital technology. If you are finding yourself overwhelmed with organizing, printing, and backing up your digital photos, I hope these simple tips will help you get started!

big sur, california fine art photograph

big sur, california fine art photograph

ORGANIZE YOUR DIGITAL PHOTOS: 1. Create a main “2011 Pictures” folder where all of your photos will be organized. Avoid uploading random folders to your desktop, assuming you will organize them later. If you take a lot of photos, you may wish to create sub-folders for every month.

2. Upload your photos after each “event” and label each folder with the “event” date followed by a short title for easy reference (ex. 5-8-11 Mother's Day).

3. Take a few extra minutes to flag your favorites and move your out-takes to a sub-folder. I call this folder "No's."

4. Immediately back up your files to a second location (see “Back up your Images” below)

Most importantly, create a straightforward system that works for you and stick with it.

grand canyon, diana camera photograph

grand canyon, diana camera photograph

BACK UP YOUR DIGITAL IMAGES: THE MOST IMPORTANT STEP OF ALL!

The simple rule of thumb is to make sure you have your digital media saved in 2-3 places to prevent loss. They say, it's not a matter of “IF” your hard drive will fail, it is “WHEN.” Backing-up files is the single most important step in my workflow for both my personal and professional work. I actually have all of my personal and client files backed up in 5 different places (hard drive, external hard drive, 2 separate DVD back ups, and a remote back up off-site.)

Why so neurotic? I had a hard drive failure in ‘99 and lost a boat load of my digital snapshots. That experience made me swear off digital for many years, during which time I happily shot film exclusively and made magic in the darkroom. Most importantly, it helped me realize how integral a solid back-up system is when I finally went digital professionally.

If you don’t have time to print your photos, I urge you to at least make time to back them up. Trust me, in the event of a hard drive crash, you will absolutely not regret the time you spent backing up your photographs!

1. Immediately upon uploading your digital photos to a specific folder, copy the files to an external hard drive or burn a hard-copy disc. Label the disc with the same name as the folder(s) on your computer. You might decide to store this disc in a photo storage box (filed accordingly with the prints) or in a fire safe box.

2. For added peace of mind, use a remote back up service, which automatically backs up your files to a remote location. I have used Carbonite for the past several years. Another simple remote back up solution is to store hard copy back ups at a family member's home.

3. Remember: Do not format / erase your camera’s memory card until you have uploaded the images to your computer AND made a copy of your files to a second location (external hard drive, a disc, or both.) If you do accidentally delete your camera's memory card before you've transferred your images, don't panic... there is a solution called RescuePRO.

malibu, califonia fine art photograph

malibu, califonia fine art photograph

PRINT YOUR DIGITAL PHOTOS:

1. At the end of each month, set aside a bit of time to order your favorite photos from the previous month(s) as 4x6 prints (or larger sizes to frame). There are many online photo labs to choose from so you never have to leave your home.

2. Organize your prints in an archival photo box or album. I am currently using a photo box system, in which I label each divider with the month/year and list the events included. You might also choose to commemorate special events or trips in a book or album.

3. If you have fallen behind in making prints, set small goals for yourself and take it one day at a time. It can feel like a daunting task, but once you get started, it won’t be so bad – trust me!

Creating a simple workflow system that works for you is so necessary in this digital age. Honor your memories by organizing, printing, and regularly backing up your digital pictures. The peace of mind is priceless! If you have questions or if you would like more personalized photography advice, please don’t hesitate to post in the comments section or on my Facebook page. I would love to help!